Những cách tắt Windows Defender win 10 nhanh chóng
Dưới đây là những cách tắt Windows Defender trên Windows 10 một cách nhanh chóng:
Sử dụng thanh tác vụ:
Nhấp chuột phải vào biểu tượng Windows Defender trên thanh tác vụ (góc dưới cùng bên phải màn hình).
Chọn "Mở Windows Defender Security Center".
Trong cửa sổ Windows Security, chọn "Bảo vệ chống virus và bảo mật".
Nhấp vào "Cài đặt bảo vệ chống virus và bảo mật".
Tắt chế độ "Bảo vệ thời gian thực" bằng cách di chuyển thanh trượt sang vị trí "Tắt".
Lưu ý: Windows Defender sẽ tự động kích hoạt sau khi khởi động lại máy tính.
Sử dụng PowerShell:
Mở PowerShell bằng cách nhấp chuột phải vào Menu Start và chọn "Windows PowerShell" hoặc "Windows PowerShell (Admin)".
Nhập lệnh sau và nhấn Enter:
sql
Copy code
Set-MpPreference -DisableRealtimeMonitoring $true
Lệnh này sẽ tắt chế độ theo dõi thời gian thực của Windows Defender.
Sử dụng Registry Editor:
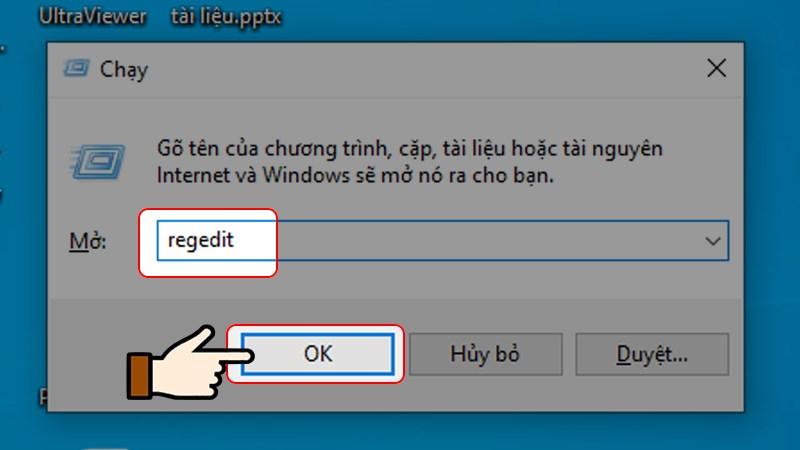
Nhấn tổ hợp phím "Windows + R" để mở hộp thoại Run.
Nhập "regedit" và nhấn Enter để mở Registry Editor.
Điều hướng đến đường dẫn sau: HKEY_LOCAL_MACHINE\SOFTWARE\Policies\Microsoft\Windows Defender.
Tạo một khóa DWORD (nếu không tồn tại) với tên "DisableAntiSpyware" và đặt giá trị của nó thành "1".
Khởi động lại máy tính để áp dụng thay đổi.
Lưu ý: Tắt Windows Defender có thể giảm mức độ bảo vệ của máy tính. Đảm bảo rằng bạn có một phần mềm diệt virus hoặc giải pháp bảo mật thay thế trước khi tắt Windows Defender.
Xem thêm:
https://chuyentoantin.com/cach-tat-windows-defender-win-10/ #chuyên_toán_tin,
#cách_tắt_Windows_Defender_win_10,
#các_cách_tắt_Windows_Defender_win_10,
#hưỡng_dẫn_tắt_Windows_Defender_win_10 Những cách tắt Windows Defender win 10 nhanh chóng
Dưới đây là những cách tắt Windows Defender trên Windows 10 một cách nhanh chóng:
Sử dụng thanh tác vụ:
Nhấp chuột phải vào biểu tượng Windows Defender trên thanh tác vụ (góc dưới cùng bên phải màn hình).
Chọn "Mở Windows Defender Security Center".
Trong cửa sổ Windows Security, chọn "Bảo vệ chống virus và bảo mật".
Nhấp vào "Cài đặt bảo vệ chống virus và bảo mật".
Tắt chế độ "Bảo vệ thời gian thực" bằng cách di chuyển thanh trượt sang vị trí "Tắt".
Lưu ý: Windows Defender sẽ tự động kích hoạt sau khi khởi động lại máy tính.
Sử dụng PowerShell:
Mở PowerShell bằng cách nhấp chuột phải vào Menu Start và chọn "Windows PowerShell" hoặc "Windows PowerShell (Admin)".
Nhập lệnh sau và nhấn Enter:
sql
Copy code
Set-MpPreference -DisableRealtimeMonitoring $true
Lệnh này sẽ tắt chế độ theo dõi thời gian thực của Windows Defender.
Sử dụng Registry Editor:
Nhấn tổ hợp phím "Windows + R" để mở hộp thoại Run.
Nhập "regedit" và nhấn Enter để mở Registry Editor.
Điều hướng đến đường dẫn sau: HKEY_LOCAL_MACHINE\SOFTWARE\Policies\Microsoft\Windows Defender.
Tạo một khóa DWORD (nếu không tồn tại) với tên "DisableAntiSpyware" và đặt giá trị của nó thành "1".
Khởi động lại máy tính để áp dụng thay đổi.
Lưu ý: Tắt Windows Defender có thể giảm mức độ bảo vệ của máy tính. Đảm bảo rằng bạn có một phần mềm diệt virus hoặc giải pháp bảo mật thay thế trước khi tắt Windows Defender.
Xem thêm: https://chuyentoantin.com/cach-tat-windows-defender-win-10/
#chuyên_toán_tin, #cách_tắt_Windows_Defender_win_10, #các_cách_tắt_Windows_Defender_win_10, #hưỡng_dẫn_tắt_Windows_Defender_win_10